
Lately, I’ve been obsessed with anything rose-flavored — tea, ice cream, cookies, and now, CAKE! That would explain why my eyes widened when one of our very own So Yummy food stylists, Sade (she’s the one who makes the food look like #foodporn in a lot of our videos), shared this amazing cake recipe with us. I’m not normally huge on floral scents and flavors, but rose has been such a big flavor trend lately, and it’s one I can actually get behind.
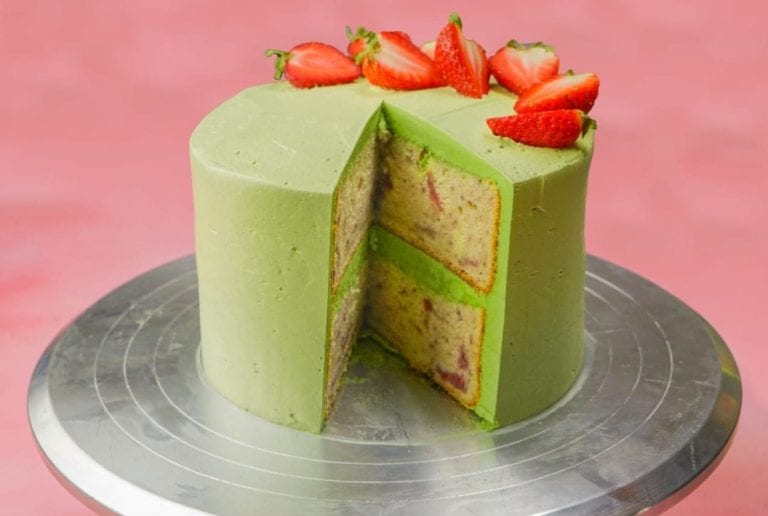
Sade brought to us this beautiful strawberry matcha rose cake. I know, there’s a lot going on here, but trust me — it all came together so beautifully.
If you’re wondering what “matcha” is, it’s that trendy green powder you’ve been seeing in coffee shops and stores. It’s a form of green tea, but more more powerful (and caffeinated). Many people prefer matcha over coffee, because it gives you energy without the jitters.
Anyway, back to the cake. There’s a lot of texture that comes through in this dessert, especially with the strawberry seeds mixed into the batter. Who doesn’t love a little crunch with their cake? To learn more about this heavenly treat, I reached out to Sade to learn about how to create this dessert. It turns out that she, too, doesn’t like a lot of floral flavors, but was given the idea one day after eating strawberry rose vegan ice cream (sounds so delicious, right?!). Interestingly enough, the addition of matcha powder into the frosting was inspired by the whipped topping on Starbucks’s drinks.
All together, we like to call this cake “A Starbucks Frappuccino As A Cake” or Rose Matcha Green Tea Cake. Whichever you decide, you’re going to love this recipe.

So Yummy
How do you get the most flavor out of your strawberries without it feeling like you’re just munching on strawberry chunks?
By reducing your strawberries over the stove, and creating a gorgeously potent strawberry syrup. Once your pint of strawberries is washed off and halved, add them to a small saucepan. Pour in a ½ cup of granulated sugar with the strawberries. You’re going to cook this on low-medium heat for about 30 minutes. You’ll know you’re there when basically all of the liquid is cooked out and the amount you started with has reduced in size by about half.
The reducing process doesn’t need a whole lot of attention from you. There’s no need to stand over the pot for 30 minutes and constantly stir. All you’ll need to do is keep a close eye on it, but you can also move onto mixing your dry ingredients and preparing your cake batter.
We’re creaming butter again, y’all. If anyone remembers my past experience with creaming butter, you’ll know how #scarred I am.
Luckily, we’re not working with brown butter this time around. Just throw a stick of store-bought, unsalted butter into a bowl with a cup of granulated sugar and whisk it on up. It’s best to go ahead and use either a hand mixer or a standing electric mixer. Whisk the butter and sugar on a high speed. It might be necessary to stop occasionally to scrape any excess mixture off the side of the bowl during this process. This should take about 5 minutes for everything to be fully smooth and creamed.

So Yummy
The steps to this process are very important. Normally, when I’m baking, I just throw all of my eggs into the bowl at the same time and then I start furiously mixing in hopes that everything will turn out OK. Learn from my mistakes — don’t add the next egg until you can see that the egg you previously added has fully combined with the creamed butter. Make sure that there is no liquid-y egg white or yolk in sight. Repeat this for all 3 eggs, beating them in on a low speed.

So Yummy
For the rosewater, we used the Nielsen Massey brand. All you’ll need is 2 teaspoons of this stuff. Trust me, you’ll definitely be able to taste the rose flavor within that first bite. If you’re feeling a more subtle rose flavor, try only adding 1 teaspoon. From here, on low speed again, add in 2 ½ cups sifted (don’t forget to do this beforehand!) cake flour, ½ teaspoon salt, 2 teaspoons baking powder, and ½ teaspoon baking soda. Once all of this has had some time to thoroughly mix together, slowly pour in ½ cup of milk (we chose cashew milk) while the mixer is still going. Once all of the milk has been added, turn off the mixer.
Did you forget about your strawberry puree?!

So Yummy
During the process of preparing your cake batter, your strawberry puree will most likely be reduced enough. As soon as you notice that it’s ready to go (it should resemble hot strawberry jam), remove it from the heat and allow it to reach room temperature before adding it to your cake batter. Pro tip: pop it in the fridge for a few minutes to help speed up the time and help it cool down faster.

So Yummy
Once the puree is at the correct temperature, slowly pour it in with the cake batter. You’ll want to gently fold this in, instead of mixing it in. A rubber spatula will do just fine for this. Be careful to not overmix this; the cake batter should still be thick and sticky.
You’re ready to pour!

So Yummy
For our cake, we poured our batter into two 6” silicone cake molds. It’s optional to have two layers on your cake. If you don’t have two cake molds that are the same size, and don’t have the time to wait for the cakes to bake one at a time, just stick to one layer. We baked the cakes for 35-40 minutes at 375°F/190°C. If you’re only baking one cake, the oven temperature and baking time may vary. If that’s the case, definitely keep a close eye on your cake to prevent it from burning!
Here comes the fun part: FROSTING!
We’re not using any of that store-bought frosting for this recipe. This is a frosting you’ll be proud of yourself for making. All of your followers on Instagram will be green with envy over your baking skills!
You’re going to need that standing mixer again. Add in 175g of egg whites (about 6 eggs) and 1 cup of granulated sugar. Getting the exact weight for this is important. Whipping egg whites and getting them nice and fluffy is a bit tricky for the inexperienced baker. Whip this up on a medium speed just until the sugar is moist and well-incorporated with the egg whites.

So Yummy
Now we need to heat up our egg whites and sugar. To create a double boiler all you’ll need is a normal pot, some boiling water, and the bowl you’re mixing in. If you’re working with a standing mixer, the glass bowl that attaches will work just fine for this. Put the pot of water over your heat source and fit your mixing bowl on top of the pot. Gently whisk this mixture until the temperature has reached 160°F/71°C. You need to be very precise with this, so a thermometer is very important to use here. Heating to this temperature will take about 5-8 minutes. Immediately remove the mixture from the heat once the temperature has been reached. Set your bowl back up on the mixer, and whisk this on the highest speed for about 8-9 minutes until the egg whites form stiff peaks.
The final steps for the frosting are adding in 3 sticks of softened butter. Do this one tablespoon at a time. But wait for the bowl to cool down a little before this process, so the butter doesn’t melt right away.

So Yummy
Once all of the butter has been added, it’s time to give this frosting some color! Add in 1 ½ tablespoons of pure matcha powder. Kick up the speed again and mix this with medium-high speed until the frosting becomes light in texture.
We’re in the final stretch.
Before you begin assembling, your cakes absolutely must be cool before adding any frosting. If the cakes are still warm, the frosting will melt and run right off the cake, and you’ll be left with a big green mess. No one wants that. When you take the cakes out of the oven, it’s best to place them on a wire rack so the bottoms can cool evenly.

So Yummy
Remove the cakes from the baking molds and, using a serrated knife, trim off the tops so you’re working with a flat surface perfect for layering! Pro tip: place your cakes onto a cake stand before you begin the decorating process! Squeeze a dollop of frosting onto the cake stand and set your first cake layer down, so it stays secure and there’s no risk of it sliding around on the stand.

So Yummy
If you are working with two cakes instead of one, pipe some of the matcha frosting on top of the bottom layer. The best way to evenly apply your frosting is to pipe it from a piping bag. The whole process will be so much smoother and you’ll have more control over the frosting.

So Yummy
When the first layer of frosting has been added, place the second cake on top. Gently press down on it, so it sticks to the frosting and creates a little seal with the bottom cake. This is where working off of a cake stand comes in handy. Take your piping bag of frosting and pipe along the outside of the cake, starting at the bottom and working your way up. (Be generous with how much you’re applying. You want to make sure the frosting isn’t so transparent that you can still see the cake underneath.) Pipe some frosting on the top of the final cake layer, too. If there are any spots that seem to be low on frosting, go back in and pipe a few dollops on there.
This one is for the true ASMR fans out there.

So Yummy
Is there anything more satisfying than watching frosting be spread? The answer: there isn’t. It’s time to get professional and bust out that frosting scraper. Start with scraping the sides of the cake. Slowly rotate the cake stand as you hold the scraper in place and smooth out the rough layer of frosting. Again, if you see any thin spots, go back in with more frosting. Scrape and repeat until the desired thickness is reached. Repeat the process for the top of the cake as well.
Hang in a little longer — you’re almost done!

So Yummy
All that’s left is the finishing touches and this cake is #done. Hopefully you saved some strawberries from before to decorate with. Slice the remaining strawberries in half (you can keep the leaves for the aesthetic) and place them on top of the cake. You can decorate them in whatever pattern you’d like. We tried to keep our decor fairly minimalistic.

So Yummy
And with that, you’ve won the showstopper challenge on The Great British Bake Off. Sade recommends this cake for special get-togethers because it will truly be the talk of the night. Plus, whoever couldn’t make it to the party will be insanely jealous that they missed out. Now, keep in mind that matcha powder oxidizes after some time, so it’s best to bake this cake knowing that it will be consumed on the same day, in one sitting. The color of the powder, after being exposed to the air, will begin to fade from that beautiful bright green to a dull green and then a tinted brown.
If you want to try this cake out for yourself, check out the list of ingredients illustrated in the images below, followed by Sade’s instructions for the cake and frosting. Happy baking!
PREP: 1 hour 30 minutes
TOTAL: 2 hours 15 minutes
SERVING: 4-6
Ingredients for the cake:

So Yummy
Instructions for the cake:
- In a small sauce pot, mix strawberries and ½ cup sugar. Cook on medium-low heat for about 30 minutes until all liquid is gone, and the mixture has reduced by half. Set aside and allow the mixture to reach room temperature.
- In a mixer with a whisk attachment, beat the butter and sugar together on high speed until it’s smooth and creamed, about 5 minutes. Scrape down the sides and up the bottom of the bowl with a rubber spatula as needed.
- Beat in the eggs on low, one at a time, until well-combined. Add rose extract. Scrape down the sides and the bottom of the bowl.
- On low speed, add flour, salt, baking powder, and baking soda.
- Once incorporated, slowly pour in the milk. Turn the mixer off.
- Gently fold in your strawberry puree, being careful to not overmix your batter. Cake batter should be a bit sticky and thick.
- Pour batter evenly into cake pans. Bake for around 35-40 minutes at 375ºF. Allow cakes to cool completely in the pans set on a wire rack. The cakes must be completely cool before frosting and assembling.
Ingredients for matcha frosting:

So Yummy
Instructions for matcha frosting:
- In a standing mixer with paddle attachment on medium speed, whip egg whites and granulated sugar, just until the sugar is moist and well-incorporated
- Over a double boiler, gently whisk egg mixture over the heat for about 5-8 minutes until the temperature reaches 160ºF.
- Then, transfer the mixture into the standing mixer and beat it on the highest setting for about 8-9 minutes. Until the egg whites form a stiff peak.
- Once the bowl cools down, slowly add softened butter, 1 tablespoon at a time. Once well-incorporated, add matcha powder and beat at medium-high speed until it becomes light in texture.