[video_quote pvideo=”” video=”pfHRowme” text=”Bake a Holiday With Blue Diamond”]
There’s just something about the holidays that gets my oven going. Whether it’s the cold weather making us long for warm treats or spoiling our friends and family every time we see them, the baker in me seems to come out every year when the Christmas music starts playing.
And, I know I’m not alone in this. There are plenty of other holiday seasonal bakers that I’m sure can relate.
But, this year, I’ve run into a problem. After the same ol’ gingerbread cookies and Christmas cake that I whip up every year, I realized that baking has become a little… boring now. I mean, these classics are still good and all, but sometimes you just need a little change to spice it up.
This is why we partnered with our friends at Blue Diamond to showcase these new, super cute, and easy holiday desserts! With yummy treats such as Melting Snowman Blondie Decor and Blue Diamond Brownie Tree Trimming, my family hasn’t been able to get enough of them!
So, yes, this set of recipes is now going to be my go-to for the next few years. And, I know they will be yours, too.

Perfect Almnd Flour Pie Crust and Design Hacks
Perfect Almond Flour Pie Crust and Design Hacks
Difficulty: Medium • 6 Servings • Total Time: 1 Hour 10 Minutes
Ingredients:
Almond Flour Pie Crust
- 1 ¼ lbs or 5 cups Blue Diamond Almond Flour
- ½ teaspoon salt
- ¼ cup sugar
- ¼ cup unsalted butter, room temperature
- 2 eggs
Filling
- 30 oz or 1 can of pumpkin pie filling
- ⅔ cup evaporated milk
- 2 eggs
Directions:
- Preheat the oven to 350 degrees fahrenheit.
- In a medium-sized bowl, add all the pie crust ingredients. Then, mix the ingredients with a spatula or your clean hands until well incorporated and a dough forms.
- Pull off ¼ cup of the dough and set it to the side. Then press the rest of the dough into a 9” pie pan to form a crust. You can use the bottom of a glass to ensure the pie crust is level and evenly pressed down.
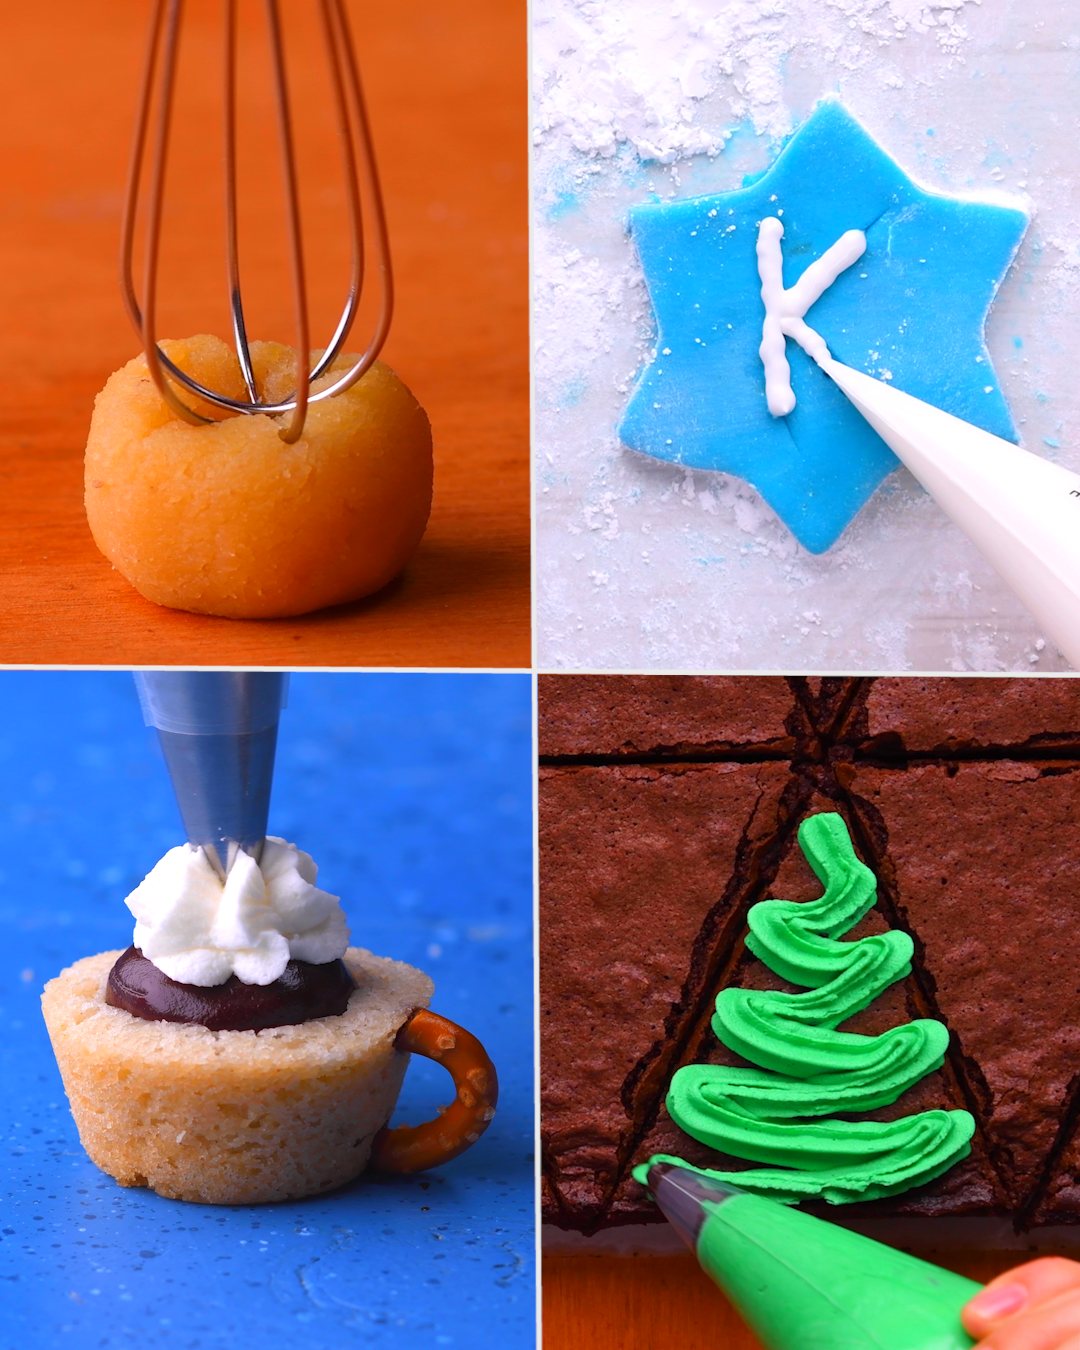
- Next, decorate the outer edges of the pie crust. You can use the handle of a whisk to create a unique border around the pie.
- In a separate bowl, mix together the ingredients for the pumpkin pie filling. Pour the mixture into the pie crust evenly.
- Now for a super fun decorating hack for the top of your pie! We will take the extra pie dough you set aside earlier to make an assortment of decorative mini-pumpkin toppings.
- First, divide the dough into 12-15 rolled balls, leaving about a teaspoon of the dough to the side.
- Take the bottom bulb of a whisk and press it down on top of each dough ball to create the ridges for the mini pumpkins. Then take the extra teaspoon of dough and make a tiny steam for the top of each pumpkin.
- Arrange the pumpkins on top of the pumpkin pie filling and bake in the oven for 45 minutes.
- Let cool for 30 minutes and serve or refrigerate for later! Enjoy this classic pumpkin pie with a delicious Blue Diamond Almond Flour crust!

Blue Diamond Brownie Tree Trimming
Blue Diamond Brownie “Tree Trimming”
Difficulty: Easy • 12 Servings • Total Time: 1 Hour 30 Minutes
Ingredients:
- 1 box Blue Diamond Brownie Mix
- 2 tablespoons water
- ⅓ cup Vegetable oil
- 2 eggs
- 12 mini candy canes
- ¾ cup unsalted butter, room temperature
- 1 ¾ cups powdered sugar
- 1 tablespoon milk
- Green food coloring
- ¼ cup mini M&Ms
Directions:
- Preheat the oven to 350 degrees fahrenheit.
- In a bowl mix together Blue Diamond Brownie mix, water, eggs and oil. Pour the brownie batter into a greased 11” x 7” pan lined with parchment paper that is slightly larger than the pan. This will allow for easy removal once baked. Bake brownies for 28-33 minutes.
- Let the brownies cool completely. Then pull up the parchment paper on the sides to remove the brownie from the pan.
- Next, slice the brownies in cross sections to create 12 brownie triangles.
- Now to create the trunk for each brownie tree! Take your candy canes and break the curved part off. Then stick the straight part of each candy cane into the bottom of the brownie triangles.
- In a bowl, whip unsalted butter, powdered sugar, milk and green food coloring. Add the green frosting into a piping bag fit with a #17 star tip. Starting from the top of each brownie, pipe down in a zigzag motion to create the branches of the tree.
- Arrange mini M&Ms on each brownie tree and enjoy this tree-mendous dessert!

Easy Cookie Cutter Marzipan Candy
Easy Cookie Cutter Marzipan Candy
Difficulty: Medium • 12 Servings • Total Time: 1 Hour
Ingredients:
- 1 ¼ cups Blue Diamond Almond Flour
- 1 cup Powdered Sugar
- 3 tablespoons water
- 1 tablespoon Vanilla Extract
- Blue food coloring
- White food coloring
Royal Icing
- 1 cup powdered sugar
- 1 tablespoon meringue powder
- 1 ½ tablespoons water
- Blue food coloring
Directions:
- In a food processor, add Blue Diamond Almond Flour, powdered sugar, water, and vanilla extract. Mix until the dough holds together to make a marzipan ball.
- Separate the dough into two balls. Next, add blue food coloring to one ball and white food coloring to the other.
- Sprinkle powdered sugar onto a clean surface and roll out the blue marzipan to ¼” thickness. Using a 2” Star of David cookie cutter, make 8 candies.
- Then roll out the white marzipan to ¼” thickness. Using a 4” Star of David cookie cutter, make 1 large marzipan candy.
- In a bowl, mix together the ingredients for the royal icing. Separate 3/4 of the royal icing into a separate bowl and mix in blue food coloring. Then add both the royal icings into two individual piping bags.
- Next, we are going to spell out Happy Hanukkah on the Star of David marzipan candies. We are going to achieve this using fun stencil hacks!
- Take the 8 blue Star of David candies and spell out each letter of Hanukkah on each star. To make sure your letters look perfect, you can use the teeth of a fork to imprint the letter on each candy. Then use the white royal icing trace over the indents. Set each candy aside to dry.
- We are going to write “Happy” on the large Star of David. Place a piece of parchment paper over a happy birthday card or gift tag. Press down onto the parchment, so the word “Happy” is visible. Then take the blue royal icing and trace the word Happy. Then set it to the side to dry.
- Carefully pick up the dried royal icing and set it on top of the white Star of David. Be sure to push it down slightly so it sticks to the candy.
- Arrange these festive Hanukkah candies on a plate for your friends and family to enjoy!

Melting Snowman Blondie Decor
Melting Snowman Blondie Decor
Difficulty: Easy • 12 Servings • Total Time: 1 Hour
Ingredients:
Cookies
- 2 ½ cups Blue Diamond Almond Flour
- 1 egg
- ¼ cup sugar
- ⅓ cup unsalted butter, room temperature
- 1 teaspoon vanilla extract
- ½ teaspoon baking soda
- 1 teaspoon cream of tartar
- Pinch of Salt
Sugar Coating
- ¼ cup sugar
- 1 tablespoon Cinnamon
Cookie Toppings
- 6 jumbo marshmallows
- 2 cups powdered sugar
- 4 tablespoons of unsalted butter, room temperature
- 2 tablespoons milk
- Black circle quin sprinkles
- Orange jimmies sprinkles
- 12 Reese’s Minis
- 12 Reese’s Cups
Directions:
- Preheat the oven to 350 degrees fahrenheit.
- In a bowl, mix together all the ingredients needed for the cookies. Mix until thoroughly combined and a dough forms.
- On a plate, mix together the sugar and cinnamon. Then using a medium cookie scoop, scoop the dough onto the plate and roll it into the sugar coating.
- Place the dough balls 1 ½” apart onto a cookie sheet lined with parchment paper. Bake for 12 minutes.
- While the cookies cool, cut the marshmallows in half and set aside.
- Take each Reese’s Cup and carefully slice off the ridge top about 2 mm in thickness. Then take Reese’s Minis and place them on the ridged top you just cut off. Repeat to make 12 Reese’s hats!
- In a bowl, mix together powdered sugar, unsalted butter, and milk to make icing. Set aside.
- Now that the cookies are cool, time to assemble the melted snowmen.
- Using the sticky side of each marshmallow half as the glue, attach them to the tops of the cookies.
- Pour the icing on top of the marshmallow to create a melted effect.
- On the top of each marshmallow, add two black sprinkles as the eyes and an orange sprinkle as the nose to make the snowman face.
- Lastly, add the Reese’s hat to the side of the Melting Snowman Blondie! Enjoy!

Almond Flour Holiday Cookie Cups
Almond Flour Holiday Cookie Cups
Difficulty: Easy • 12 Servings • Total Time: 1 Hour
Ingredients:
Cookie Dough
- 2 ½ cups Blue Diamond Almond Flour
- ⅓ cup unsalted butter, softened to room temperature
- ¼ cup sugar
- 1 egg
- 2 teaspoons vanilla extract
- ½ teaspoon baking powder
- Pinch of salt
Filling
- ½ cup heavy whipping cream
- 1 cup semi-sweet chocolate
Topping
- 1 cup heavy whipping cream
- ¼ cup powdered sugar
- ¼ cup crushed peppermint
- 1 tablespoon semi-sweet chocolate, melted
- ½ cup gluten free pretzels
Directions:
- Preheat the oven to 350° F
- Cream the butter and sugar together. Then add the egg and vanilla extract.
- Add the dry ingredients into the wet ingredients and mix until a dough forms. Refrigerate dough for 20 minutes.
- In a greased mini cupcake pan, fill the dough in each hole ¾ of the way up. Bake for 10 minutes or until golden brown. Once cookie cups are baked take the end of a wooden spoon and press down in the center to create a cup.
- While the cookie cups cool, prepare the chocolate ganache. Microwave until chocolate is melted then add ½ cup heavy whipping cream. Whisk until smooth and shiny. Add a spoonful of ganache in each cooled cookie cup.
- Now it’s time to make the handle to your cookie cup. First break off the round part of your pretzels and set them aside.
- Next, melt the additional tablespoon of chocolate and dip the end of the pretzels into it. Place the pretzel on the side of the cookie cup where you would like the handle to be. The chocolate will act as a glue on the cookie cup.
- In a small bowl add 1 cup of heavy whipping cream and whisk until soft peaks form. Then add ¼ cup of powdered sugar and continue whisking until stiff peaks form. Top each cookie cup with whipped cream and a sprinkle of peppermint. Another optional purely decorative topping is to cut a straw into small pieces and place it into the cookie cup!
- Enjoy these fun and easy to make Almond Flour Holiday Cookie Cups! Cheers!
