Foolproof Dutch Oven Bread: The Ultimate Beginner’s Guide to Bakery Bliss!
What if the most gorgeous, crackly, bakery-style loaf you’ve ever tasted didn’t require a culinary degree or a messy kitchen? It’s golden, it’s glorious, and it’s shockingly simple! We know that 71% of food lovers say texture is the ultimate deal-breaker, yet so many of us fear the “yeast beast” or the sticky nightmare of traditional kneading. You might worry about ending up with a dense, flat brick, but it’s time to toss those doubts aside. This dutch oven bread recipe for beginners is your high-energy ticket to artisan excellence without the stress.
Get ready to master a crunchy, crackly crust and a soft, airy interior using just four basic ingredients. We promise a foolproof process that feels more like a fun experiment than a kitchen chore. You’ll learn how to harness simple steam to achieve that professional “wow” factor right in your own oven. We’re diving into the tools, the timing, and the tiny tweaks that turn simple flour into pure kitchen magic. Let’s get messy, get creative, and get baking!
Key Takeaways
- Master a foolproof dutch oven bread recipe for beginners using just four pantry staples and absolutely zero messy kneading!
- Discover how “The Big Nap” lets time and hydration do the heavy lifting for a perfectly airy, cloud-like interior.
- Learn why the Dutch oven is your secret weapon for creating that iconic, crackly, and golden crust every single time.
- Unlock “So Yummy” flavor hacks to customize your loaf with trendy global spices or classic savory mix-ins.
- Master the art of the “Crumb Shot” by learning exactly how to cool and slice your bread for maximum bakery-style bliss!
Why Dutch Oven Bread is the Ultimate Kitchen Magic!
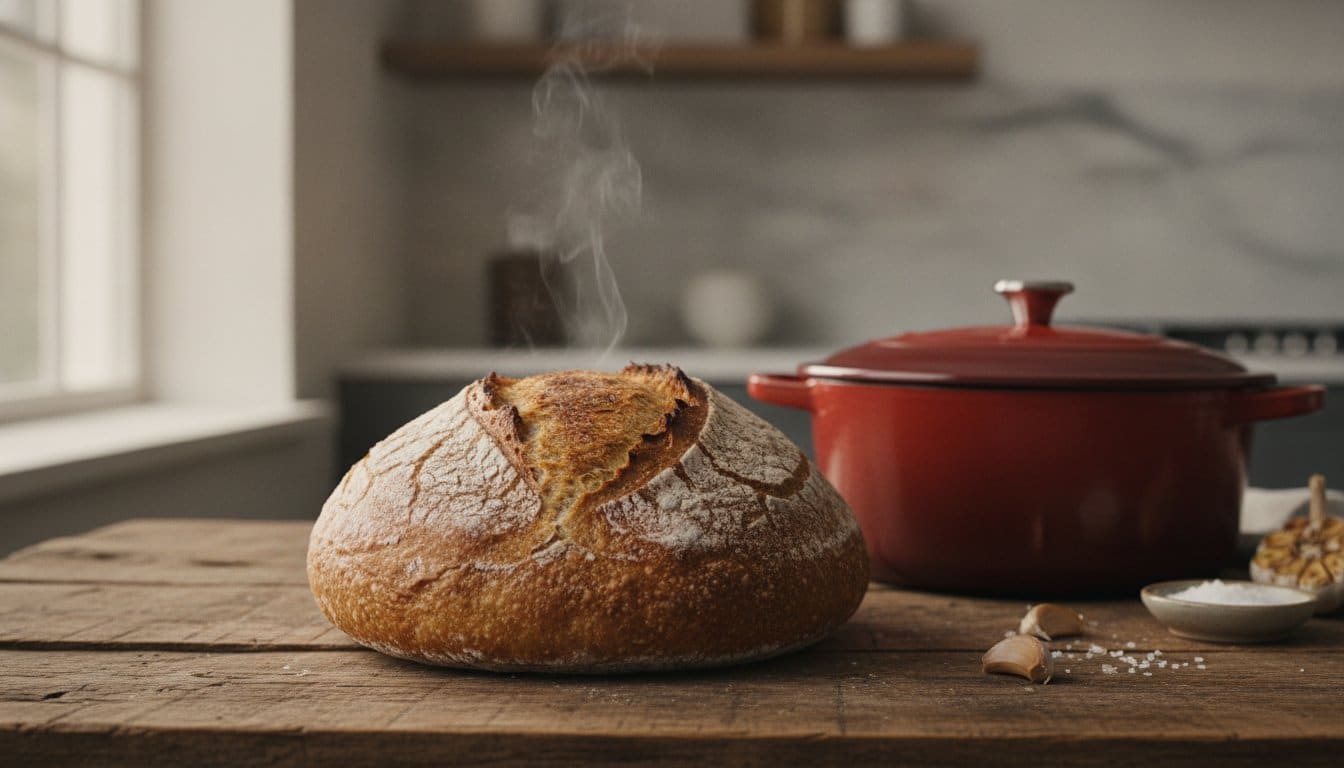
Imagine a loaf of bread so crunchy it literally sings as it cools. That is the magic of Dutch Oven bread! It is the ultimate kitchen miracle. You get a crust that is crispy, crackly, and deeply golden, paired with an interior that is light, airy, and impossibly soft. This dutch oven bread recipe for beginners isn’t just about food; it is about creating a masterpiece with zero stress. We are talking about a result so beautiful you will want to frame it before you devour it. Are you ready to turn your kitchen into a high-end bakery?
The Science of the Steam Chamber
Why use a heavy pot? It is all about the steam! When you pop that heavy lid on, you create a miniature steam chamber. This trapped moisture is the secret to a professional rise. It keeps the surface of your dough soft and stretchy for longer, allowing the bread to expand to its full, glorious potential before the crust sets. This is how you get those gorgeous, jagged cracks on top!
Then comes the Maillard reaction. This is the scientific sizzle where proteins and sugars dance together under high heat. It creates that signature “So Yummy” toasted flavor and a deep mahogany color that looks like art. Because cast iron is the absolute king of heat retention, your bread gets blasted with consistent, intense warmth from every single angle. It is like giving your loaf a warm, cozy hug that turns it into gold!
No-Knead vs. Traditional Baking
Let’s be real: traditional kneading is a total workout. Why sweat over a floury counter when you can let time do the heavy lifting? In the science of no-knead bread, hydration and patience replace elbow grease. When you let the dough sit for a long “nap,” the gluten networks form all by themselves! It is a slow, magical fermentation process that builds complex flavors.
This method is incredibly forgiving for anyone new to the kitchen. You don’t need a fancy mixer or years of experience. Research shows that 71% of consumers say texture is the main reason they enjoy bakery items, and this long-fermentation style delivers a “sourdough-lite” tang and a chewy crumb that hits every mark. It is the most relaxing way to bake. You simply mix, wait, and win! This dutch oven bread recipe for beginners proves that the best things in life don’t have to be difficult. They just need a little bit of time and a lot of love.
The Fab Four: Essential Ingredients and Tools!
Build your bread empire on just four humble pillars! Flour, water, salt, and yeast. That is all you need to create a masterpiece. This dutch oven bread recipe for beginners relies on high-quality basics to deliver high-energy results. Forget the long grocery lists. Forget the expensive additives. We are keeping it simple, savory, and spectacular! Ready to meet your new pantry besties?
Ingredient Deep-Dive: Quality Matters
Flour is your foundation. All-purpose flour is a budget-friendly superstar, costing about $0.54 per pound as of May 2026. It creates a soft, tender crumb that is perfect for sandwiches. Want more chew? Grab bread flour! It has a higher protein content to give your loaf extra structure and “bounce.”
Yeast is the life of the party! Instant yeast is the easiest choice for beginners. You can grab a 1-pound brick for around $9.95, which will last for dozens of loaves. Keep it bubbly and happy by using water that feels like a warm baby’s bath. If it is too hot, you will kill the yeast; too cold, and they will stay asleep. Sprinkle in some kosher salt for a balanced, savory flavor that makes the crust pop. For the most “So Yummy” results, weigh your ingredients with a digital scale. It is more accurate than measuring by volume and ensures your dough is perfect every single time. The famous NYT No-Knead Bread recipe proved that these exact four ingredients, when handled with love, create world-class flavor.
The Gear Guide for Beginners
Your Dutch oven is the heart of this operation. You want a 5-to-7 quart pot with a heavy, tight-fitting lid. Budget-friendly enameled cast iron models are available for approximately $36 to $60, while premium heirloom brands can cost closer to $300. Both will bake a beautiful loaf! The heavy walls hold onto heat like a pro, ensuring an even bake and a gorgeous, golden-brown finish.
Don’t forget your “magic carpet”—parchment paper! It allows you to lower your dough into a screaming-hot pot without burning your fingers. It is a total game-changer for safety and ease. Finally, you will need a scoring tool. A professional bread lame is fancy, but a very sharp kitchen knife works just as well. Use it to slash the top of your dough right before baking. This controls where the bread expands and gives you those professional, jagged peaks that look like they came from a Parisian boulangerie. If you are hungry for more inspiration, explore our latest cooking recipes to find the perfect pairing for your fresh loaf!
This dutch oven bread recipe for beginners is all about accessible excellence. You don’t need a kitchen full of gadgets. You just need the right basics and a little bit of excitement. Grab your pot, find your flour, and let’s get baking!

Mastering the No-Knead Method in 5 Easy Steps!
Are you ready for the main event? This is where the magic happens! This dutch oven bread recipe for beginners turns a few simple ingredients into a golden masterpiece. No fancy equipment. No tired arms. Just pure, unadulterated kitchen joy! We’ve broken it down into five snappy steps that anyone can master. Let’s get shaggy, get bubbly, and get baking!
- Step 1: Mix until shaggy. Grab a bowl and dump in your flour, salt, yeast, and warm water. Stir it up until it looks like a messy, shaggy clump. No neatness required here!
- Step 2: The Big Nap. Cover your bowl and let that dough rest. This is where time does the hard work for you.
- Step 3: Shape and Score. Gently tuck your dough into a round ball. Use a sharp knife to slash a quick “X” on top for that signature bakery look.
- Step 4: The Hot Drop. Carefully lower your dough into your preheated pot. It is time for the sizzle!
- Step 5: The Reveal. After 30 minutes, pop the lid off. Witness the transformation as your loaf takes on its final golden glow.
The Rise: Fast vs. Slow
How much time do you have? If you need bread for tonight’s dinner party, go for the 2-Hour Express! Use slightly warmer water and find a cozy, warm spot for your bowl. If you want maximum flavor, try the Overnight Chill. Let your dough hang out in the fridge for 12 to 18 hours. This slow fermentation creates deep, complex, and tangy notes that mimic a sourdough vibe. Don’t just watch the clock; watch the dough! You are looking for visual cues like tiny bubbles on the surface, a slight wiggle when you shake the bowl, and a doubled volume. When it looks alive, it’s ready!
The Preheating Ritual
Heat is your best friend! You must preheat your Dutch oven while your oven climbs to a “So Yummy” sizzle of 450°F (230°C). Putting a cold pot into a hot oven is a recipe for disaster. You want that cast iron screaming hot to create instant steam the second the dough hits the bottom. Expert guides on baking bread in a Dutch oven emphasize that this thermal shock is what gives you that legendary crust. Safety first! These pots are heavy and hot. Use thick oven mitts, move with confidence, and handle those lids with care. Once that pot is hot, you’re just minutes away from bread bliss!
This dutch oven bread recipe for beginners is designed for instant gratification. It’s fun. It’s easy. It’s totally foolproof! Follow these steps and you’ll be staring at a professional-looking loaf before you know it. Ready for the reveal?
Flavor Hacks and Troubleshooting Your Loaf!
Every creative journey has its little bumps, but don’t let them stop your flow! Baking is a fun, messy, and rewarding experiment. This dutch oven bread recipe for beginners is designed to be super forgiving, but sometimes the dough has a mind of its own. Whether your loaf is acting shy or you want to turn up the volume on taste, we have the “So Yummy” solutions to keep you winning in the kitchen. Let’s turn those “oops” moments into “wow” moments!
Fixing Common Bread Blunders
Is your dough sticking to everything it touches? Don’t panic! A hydrated dough is a happy dough. Just give your hands a light dusting of flour and keep moving. If your loaf came out looking a bit like a pancake, your yeast might be taking an unannounced vacation. Always check the expiration date on your package! Professional favorites like SAF Instant Yeast or Fleischmann’s are reliable, but even the best yeast can lose its spark over time.
Are you worried about a burnt bottom? It happens to the best of us! If your oven runs hot, try the cookie sheet hack. Simply slide a cold baking sheet onto the rack directly below your Dutch oven halfway through the bake. This acts as a heat shield, protecting your crust from getting too dark while the rest of the loaf finishes its golden transformation. If a loaf doesn’t turn out perfect, don’t toss it! Turn it into “So Yummy” croutons or a rustic bread pudding. Every bake is a lesson in deliciousness!
Creative Mix-Ins for Artisan Flair
Ready to customize your creation? Once you master the basics, it is time to play with flavor! Add your mix-ins during the initial shaggy-mix stage to ensure every bite is packed with excitement. Try these incredible triads for instant gratification:
- The Savory Triad: Fresh rosemary, minced garlic, and flaky sea salt. It is a timeless, aromatic, and comforting classic.
- The Cheesy Triad: Sharp cheddar, spicy jalapeño, and cracked black pepper. This one is bold, zesty, and totally addictive!
- The Sweet Triad: Ground cinnamon, juicy raisins, and a swirl of honey. Perfect for a cozy, warm, and nostalgic breakfast.
- The Global Triad: Ground cardamom, zesty yuzu, and a pinch of saffron. This trendy combo is adventurous, exotic, and sure to impress your most foodie friends.
Want more inspiration for your next kitchen adventure? Check out our latest cooking recipes for more creative ways to spice up your home menu!
Before you bake, give your loaf some personality with creative scoring patterns. Use your sharp knife to slash wheat stalks, leaf designs, or simple geometric lines. These cuts aren’t just for looks; they help your bread expand without bursting! Once your masterpiece is out of the oven, store it in a paper bag to keep that crust crunchy. Avoid plastic, which can make your bread soft and sad. This dutch oven bread recipe for beginners is your canvas. Go ahead and paint with flavor!
Freshly Baked Joy: Serving and So Yummy Style!
You did it! The timer just dinged, and your kitchen smells like a cozy, high-end Parisian boulangerie. Take a moment to admire that golden, crackly, and gorgeous masterpiece you just pulled from the pot. This dutch oven bread recipe for beginners isn’t just about the baking; it’s about the pure, unadulterated joy of that very first bite! You’ve turned four simple ingredients into a work of art. Now, it’s time to celebrate your “So Yummy” success with the perfect presentation.
The Art of the Slice
Wait for the “Big Cool”! It is the hardest part of the entire process, but you must let your loaf rest for at least 30 minutes on a wire rack. Why? Because the steam inside is still finishing its work! If you slice too soon, you risk a gummy interior instead of that soft and airy crumb you worked so hard for. Once it’s cool, grab your serrated knife. This is the only tool for the job. Use a gentle, sawing motion to protect the delicate structure of your bread. This is your moment for the ultimate “Crumb Shot.” Snap a photo of those beautiful, irregular air pockets and show off your hard work to the world!
If you have leftovers (a big “if”!), keep them in a paper bag to maintain the crust’s integrity. Want to bring back that “just baked” crunch the next day? A quick trip to the toaster will revive that sizzle in seconds. You can also transform your loaf into the world’s best French toast or crunchy, garlicky croutons. The possibilities are endless, exciting, and always delicious!
Ultimate Serving Suggestions
Ready to elevate your slice to “So Yummy” status? Your homemade bread is the perfect canvas for bold flavors. Whether you’re hosting a brunch or just treating yourself, these pairings are guaranteed to wow:
- The Sweet and Salty Sensation: Slather a warm slice with whipped honey butter and a tiny pinch of flaky sea salt. It’s nostalgic, creamy, and totally decadent!
- The Ultimate Dipping Trio: Create a shallow pool of high-quality olive oil, a splash of tangy balsamic vinegar, and a sprinkle of dried Italian herbs.
- The Savory Soak: Serve thick wedges alongside a steaming bowl of tomato basil soup or a hearty beef stew.
This dutch oven bread recipe for beginners is your gateway to a lifetime of bakery bliss. It is simple, sophisticated, and totally addictive! Don’t keep the magic to yourself. Join our creative gathering by sharing your “So Yummy” satisfaction on social media. Tag your bakes, share your flavor hacks, and inspire others to start their own kitchen experiments. You’ve mastered the magic, now go enjoy the feast!
Bake Your Way to Artisan Brilliance!
You have the tools, the tips, and the secret steam-chamber science to conquer the kitchen! Remember, world-class bread starts with just four basic ingredients and a little bit of patience. By choosing the right flour and letting time do the heavy lifting, you’ve unlocked a foolproof path to that legendary, crackly crust. This dutch oven bread recipe for beginners is your golden ticket to instant gratification and bakery-style bliss! Master the no-knead method and watch your confidence rise alongside your gorgeous dough.
Are you hungry for even more amazing experiments? We’ve already helped millions of followers join the creative food revolution with high-quality kitchenware and viral-worthy ideas. It’s no wonder we’ve been featured in major culinary media for our daring and delicious approach to home cooking! Check out So Yummy for more creative kitchen hacks and recipes! From trendy global flavors to simple weeknight wins, the magic never stops. Grab your apron, preheat your oven, and let the joy of creation take over. You’re ready to shine!
Frequently Asked Questions
Do I really need a Dutch Oven for this bread recipe?
You absolutely need a heavy, lidded pot to capture that miracle steam! While a classic cast iron Dutch oven is the gold standard for this dutch oven bread recipe for beginners, any heavy-duty, oven-safe pot with a tight-fitting lid will work. The lid traps moisture, creating that professional bakery environment right in your kitchen. Without it, your crust might be tough rather than crackly, golden, and gorgeous. It is the ultimate secret weapon for success!
Can I use active dry yeast instead of instant yeast?
You can definitely swap instant yeast for active dry yeast! Just remember to bloom it in your warm water for about five minutes until it gets foamy, fragrant, and bubbly. This ensures the yeast is alive and ready to party before you add your flour and salt. Use the same amount as the recipe calls for and get ready for a gorgeous rise. It is a simple, easy, and foolproof swap for any home baker!
Why is my no-knead bread dough so sticky?
Don’t panic because a sticky dough is actually a great sign of success! This high-hydration method is what creates those famous, airy holes and that light, cloud-like interior we all love. If it feels totally unmanageable, just dust your hands and the counter with a little extra flour. Stay positive, keep moving, and trust the process. That sticky mess is about to transform into a crispy, crunchy, and crackly masterpiece right before your eyes!
How do I get a thicker, crunchier crust on my bread?
Leave the lid off for the final 15 minutes of baking to achieve that ultimate artisan crunch! This allows the direct heat to caramelize the exterior, turning it a deep, mahogany brown. Make sure your pot is screaming hot before the dough even touches it. That intense thermal shock is the secret to a crust that is thick, toasted, and totally “So Yummy.” Listen for the bread’s song as it cools on the rack!
Can I make this Dutch Oven bread gluten-free?
You can absolutely go gluten-free with a high-quality, 1-to-1 baking blend! Look for a mix that includes xanthan gum to help mimic that chewy, traditional structure. While the texture will be slightly different, you can still achieve a golden and delicious loaf that wows your friends. It is a fun, daring, and inclusive way to bring the joy of this dutch oven bread recipe for beginners to everyone at your holiday table!
What is the best temperature for the water when mixing dough?
Aim for water that feels like a cozy, warm baby’s bath! You want it right around 100 to 110 degrees Fahrenheit to keep your yeast happy, active, and energetic. If the water is too hot, you might kill the yeast; if it’s too cold, your dough will take forever to rise. This perfect temperature ensures a fast, bubbly, and vibrant fermentation every single time you start your next big baking adventure.
How long does homemade Dutch Oven bread stay fresh?
Your fresh loaf will stay at peak quality for about two to three days! Store it in a simple paper bag at room temperature to keep the crust from getting soft, soggy, or sad. Avoid the fridge, as it can actually dry out your bread faster than you’d think. If you have leftovers on day four, turn them into crunchy croutons, savory bread pudding, or the world’s best French toast for a “So Yummy” breakfast!
Can I freeze the dough or the baked loaf?
Freezing your fully baked loaf is the best way to save that bakery bliss for later! Once it is completely cool, wrap it tightly in plastic and foil to prevent freezer burn. When you are ready for a treat, just thaw it at room temperature and pop it in a 350 degree oven for ten minutes. It will taste fresh, warm, and wonderful, just like the day you first pulled it from the pot!
