The Ultimate Baking Measurement Conversion Chart: Your Shortcut to Sweet Success!

Did you know that 71% of food lovers say texture is the absolute heart of their eating experience? It’s a fact! Whether you’re dreaming of gooey brownies, flaky croissants, or pillowy brioche, the secret to that perfect bite lives in the math. We’ve created the most vibrant, foolproof baking measurement conversion chart to turn your kitchen confusion into total creative joy.
We get it. Swapping between Imperial and Metric units feels like a chore, and losing your place mid-bake is a major buzzkill. You deserve to focus on the fun, the flavor, and the fabulous results. We promise to help you master every recipe with speed, precision, and pure kitchen magic. This guide is your shortcut to perfectly risen cakes and the confidence to try those trendy global flavors. We’re diving into the essential math, the weight vs. volume debate, and the quick answers you need for sweet success!
Key Takeaways
- Master the rhythmic heartbeat of your bakes by learning how tiny spoons and big cups build bold, massive, mouthwatering flavors.
- Grab our vibrant, foolproof, and essential baking measurement conversion chart to instantly decode the difference between liquid and dry tools.
- Go global and swap to grams for that pro-level precision that makes every international recipe feel like a fun, fresh, and fabulous experiment.
- Navigate oven temps and pan swaps with ease to ensure your treats are always golden, gorgeous, and perfectly baked.
- Save the day with genius kitchen hacks that let you bake incredible treats even when your favorite tools are missing!
Mastering the Spoon & Cup Shuffle: Essential Volume Conversions
Imagine your kitchen as a vibrant dance floor where teaspoons, tablespoons, and cups are the rhythmic heartbeat of every single bake! Volume measurements are all about the space an ingredient fills. They make our recipes feel approachable, quick, and totally effortless. While pro chefs love their scales, volume is the secret code that lets you whip up a batch of cookies in a flash. Mastering these ratios is the first step to using your baking measurement conversion chart like a pro. It unlocks a world of sweet, gooey, and gorgeous possibilities. It is about creating a kitchen flow that feels like a fun experiment rather than a boring chore. Let’s get into the groove and make some magic!
The Tiny but Mighty: Teaspoons to Tablespoons
Ever feel stuck wondering if that little pinch of salt or dash of cinnamon was enough? The golden rule of the kitchen is simple: three teaspoons always make one glorious tablespoon. It is a tiny shift that creates massive, bold, and beautiful results in your mixing bowl! When you visualize this 3:1 ratio, you stop second-guessing your math and start creating with pure confidence. Always remember that level measurements are your best friend. A heaping spoon can turn a delicate, airy rise into a sad, heavy flop. Swipe the back of a knife across the top for a finish that is sleek, smooth, and satisfying. Following these global measurement standards ensures your flavor profile stays exactly where it should be. It is the difference between a “maybe” and a “definitely!”
From Spoons to Cups: Building Your Batter
Now, let’s scale up that energy and build that batter! Sixteen tablespoons come together to create one full, perfect cup of your dry ingredients. It might sound like a lot of scooping, but it is the essential foundation of your masterpiece. Want a quick shortcut to keep your momentum high? Four tablespoons is exactly what you need for a 1/4 cup. It is the ultimate genius hack for those moments when your favorite measuring cups are buried in the dishwasher. Keeping track of 1/3 cup, which is 5 tablespoons plus 1 teaspoon, and 1/2 cup, exactly 8 tablespoons, increments helps you maintain a snappy, melodic, and fast-paced kitchen rhythm. Use your baking measurement conversion chart as a visual guide to keep the creative energy moving. You are not just following a set of instructions; you are conducting a delicious, theatrical, and sensory symphony of textures! Every scoop brings you closer to that instant gratification of a perfectly baked treat.
Liquid vs. Dry: Why Your Measuring Tools Matter
Stop! Before you grab that random mug or reach for the nearest scoop, let’s talk about the magic of tools. Not all cups are created equal in the whimsical world of baking! It’s a common trap that leads to dry, crumbly cookies or soggy, sad cakes. Your baking measurement conversion chart works best when you pair it with the right gear. Liquid measures are built for flow, while dry measures allow for a clean, satisfying level-off every single time. It’s about precision, joy, and perfect results! When you use the correct cup, you’re not just following a recipe. You’re ensuring a masterpiece that is light, airy, and totally delicious.
The Science of the Scoop: Dry Measurements
Flour is a sneaky, playful ingredient that loves to settle. If you scoop directly from the bag, you’re compressing the powder into a dense block. This can sneakily add 20% more weight to your mix than you actually need! That extra flour is the secret villain behind tough muffins and heavy breads. Use the “spoon and level” method instead. It’s the kindest way to treat your flour! Simply spoon the ingredient into your dry measuring cup until it forms a lovely mound, then sweep the excess away with the flat edge of a knife. This keeps your batter fluffy, balanced, and beautiful. For a deeper look at how weight changes everything for different ingredients, King Arthur Baking’s Ingredient Weight Chart is a fantastic resource to keep on hand. It helps you maintain that pro-level consistency every single time you bake.
Pour with Precision: Liquid Measurements
Pour with passion but measure with care! Accuracy with liquids is all about your perspective. Get down on the counter and look through the glass at eye level. You’re looking for the meniscus, which is that beautiful, tiny curve at the top of the liquid. The bottom of that curve should rest exactly on the line. Looking down from above is a recipe for a soggy disaster! These clear cups also feature a handy pour spout to prevent messy, sticky kitchen counters. Dealing with stubborn, gooey ingredients like honey or molasses? Give your cup a light oil spray first. The liquid will slide right out with zero waste and zero stress! Once you’ve mastered these tools, try our latest fun and easy cooking recipes to put your new skills to the test. Using the right tools alongside your baking measurement conversion chart ensures that every creative experiment is a sweet, stunning success.
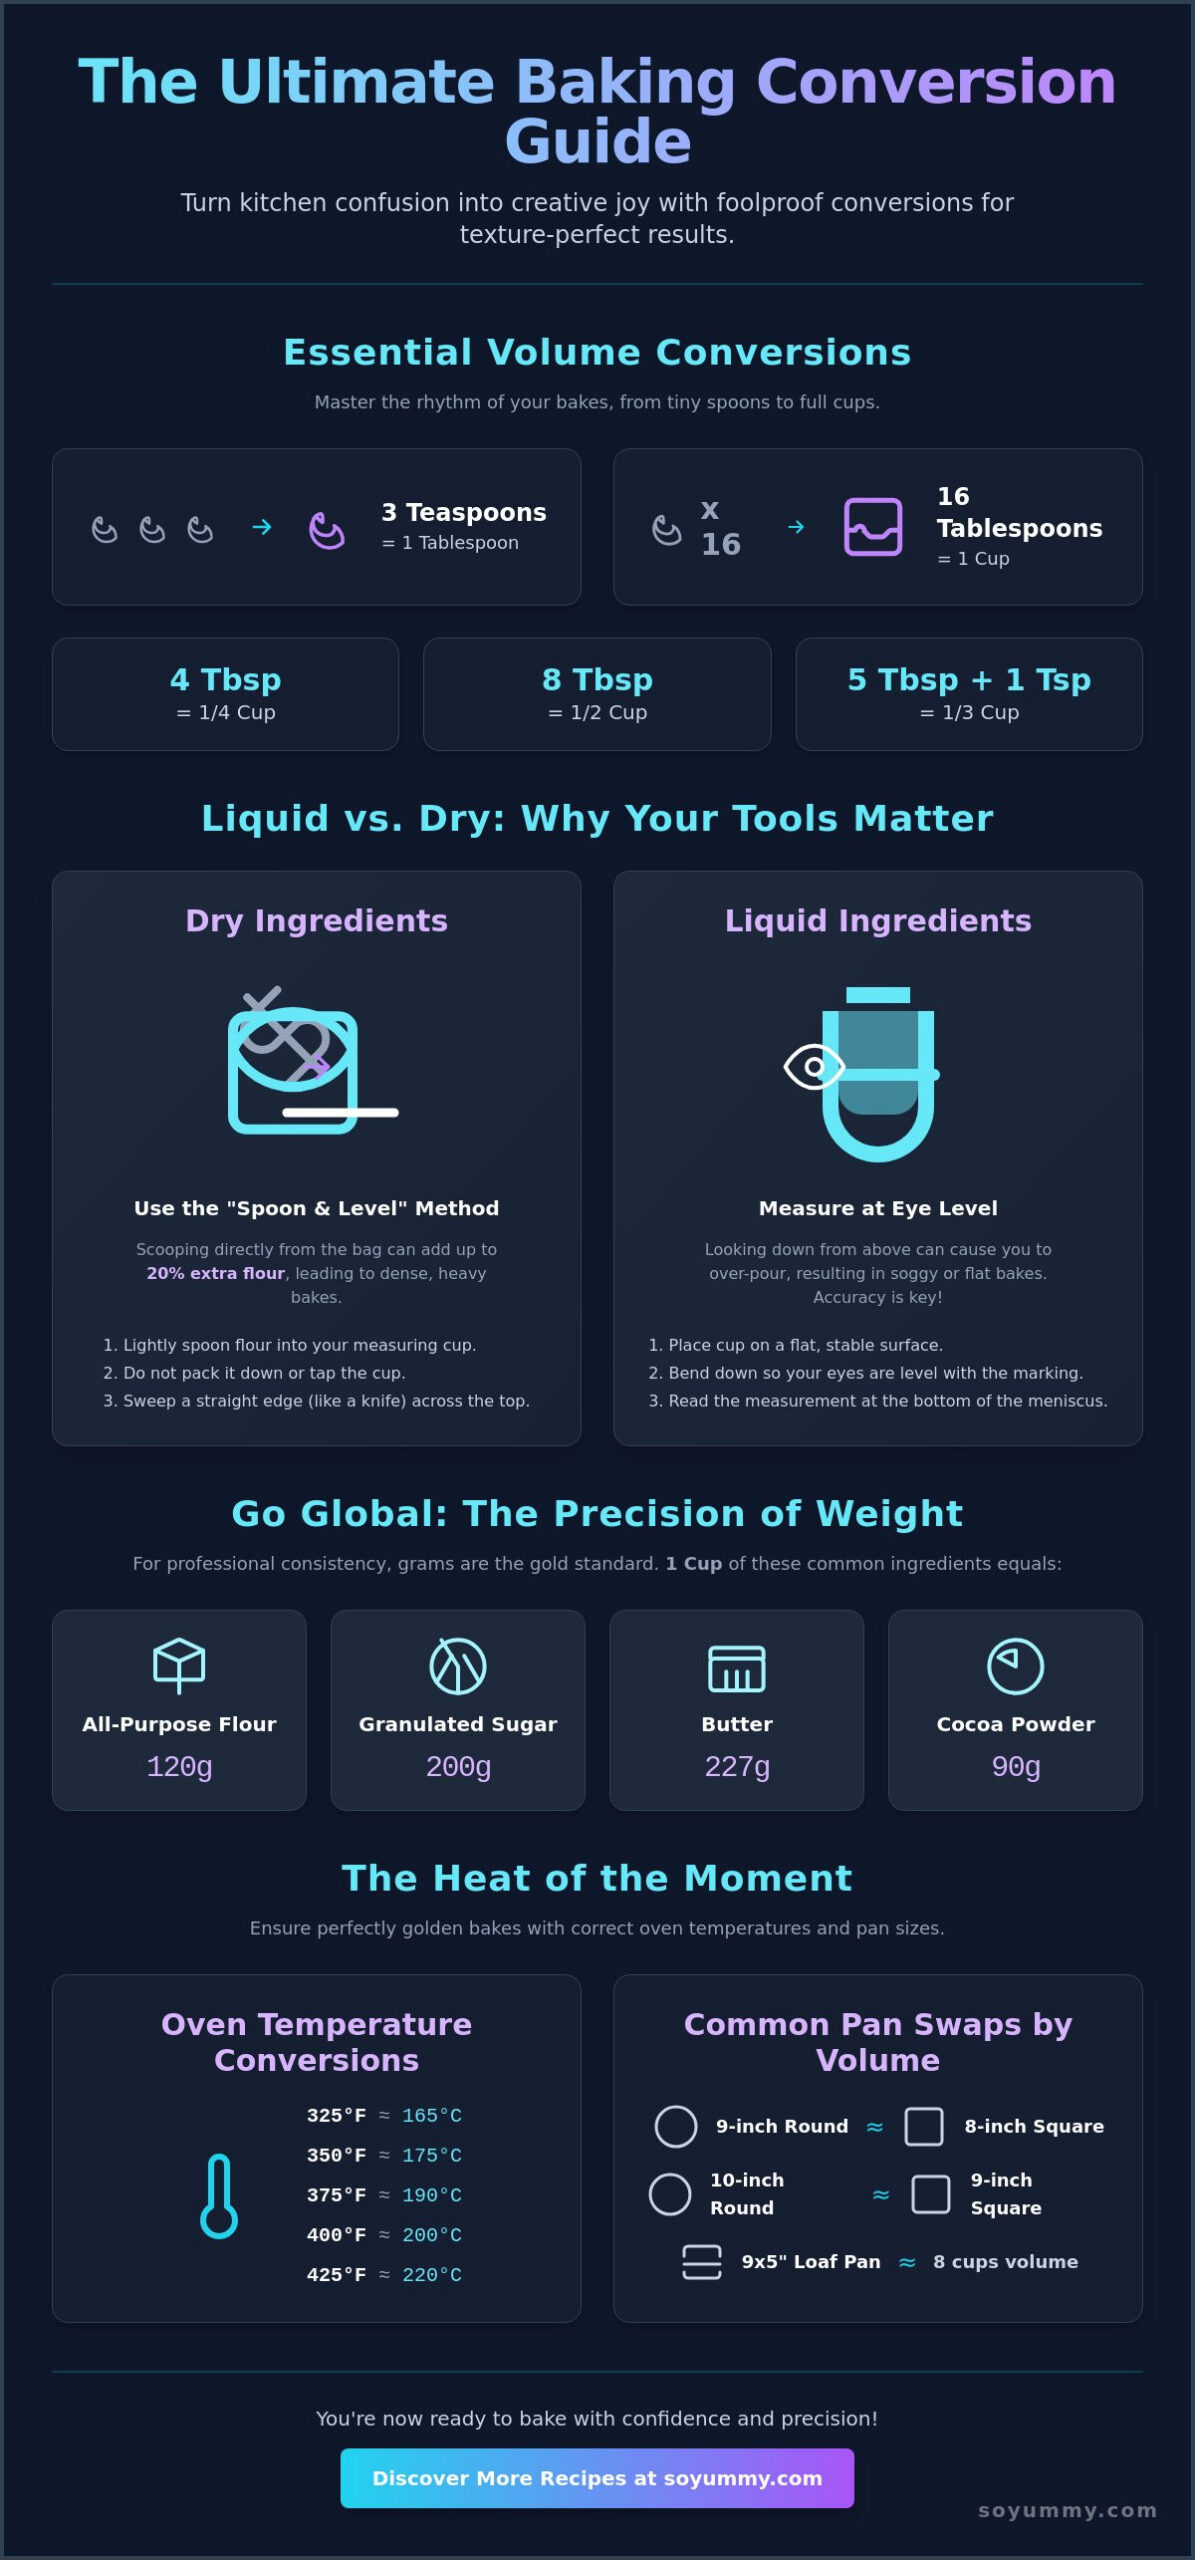
Going Global: Converting Imperial to Metric for Pro Precision
Ready to bake like a world-class pastry chef? Grams are the global language of dessert! While cups are fun and nostalgic, switching to metric is the ultimate upgrade for your kitchen. It’s fast, precise, and totally foolproof. Your baking measurement conversion chart acts as a passport to international recipes and consistent perfection. Forget the stress of “is this cup too full?” and embrace the magic of the scale. It’s a one-bowl wonder that makes cleanup a breeze and results a dream! Why dirty five different cups when you can just hit “tare” and keep moving? This shift from volume to weight is how you unlock those professional textures that 71% of consumers crave according to recent food enjoyment studies.
Weight vs. Volume: The Gram Revolution
A cup of flour is a total wild card. It’s a sneaky, shifting, and unpredictable variable! Depending on how you scoop, a single cup can weigh anywhere from 120 to 160 grams. That’s a massive 40-gram difference that can turn a light sponge into a heavy brick. Converting your favorite US recipes to metric ensures foolproof, repeatable results every single time. There’s a deep sense of psychological ease in seeing those exact numbers pop up on a bright digital scale screen. No more guessing. No more worrying. Just pure, unadulterated baking joy! For more common kitchen conversions, check out trusted guides that bridge the gap between old-school cups and modern grams. It’s about taking the guesswork out so you can focus on the flavor. You’ll find that your cakes rise higher and your cookies spread exactly the way they’re supposed to.
Common Ingredient Conversions: Flour, Sugar, and Butter
Let’s talk benchmarks! Granulated sugar is your new best friend at 200g per cup. It’s consistent, reliable, and sweet. When you’re dealing with butter, converting those classic sticks to grams (about 113g per stick) ensures that perfect, melt-in-your-mouth buttery crumb. And here’s a mind-blowing tip for your next experiment: for water and milk, the 1ml to 1g relationship is a total lifesaver. It’s a 1:1 ratio that simplifies your entire process! This “magic math” means you can measure liquids directly on your scale with total confidence. Using a baking measurement conversion chart alongside these pro tips turns your kitchen into a high-energy lab of delicious discovery. It’s all about making the process as smooth as your silkiest ganache. When you master these numbers, you’re ready to tackle any recipe from London to Tokyo with total ease and excitement!
Oven Temps & Pan Swaps: The Heat of the Moment
Temperature is the transformative energy that turns a bowl of sticky batter into a golden, glowing, gorgeous masterpiece! It is the final, fiery step in your creative journey. Navigating international recipes doesn’t have to be a burnt-edge disaster or a soggy-center letdown. Your baking measurement conversion chart is the ultimate tool for crossing borders with total confidence. Whether you’re scaling up for a massive birthday bash or down for a cozy night in, understanding heat and volume is your secret superpower. Let’s turn up the excitement and master the flames!
The Temperature Translation: F to C
Why is 350°F the magic number for almost every bake? It is the sweet spot where the Maillard reaction creates that stunning, flavorful, and aromatic crust we all love. If you’re baking from a trendy global blog, remember that 350°F is roughly 175°C. A quick trick for those high-energy moments? Subtract 32, multiply by 5, and then divide by 9. Or just keep your baking measurement conversion chart taped to the fridge for instant answers! Don’t just trust the ticking timer. Look for visual cues that tell you the magic has happened. Is the surface springy? Is the kitchen fragrant? Does a toothpick come out clean? These sensory signals are often more reliable than any clock. They ensure your treats are baked to perfection every single time.
Pan Size Math: Swapping Rounds for Squares
Think of your pans as volume vessels! An 8-inch round cake pan typically holds about 6 cups of batter. If you swap it for a 9-inch square pan, you’re looking at a capacity of 8 cups. That is a big jump! Never fill a pan more than two-thirds full. You must leave room for that dramatic, exciting, and satisfying rise. If you change the shape of your pan, you’ve got to adjust the bake time. Thinner layers bake much faster, while deeper pans need a slow, steady heat to cook the center without scorching the sides. Scaling for a crowd? Double your ingredients and use a larger vessel, but keep an eye on that depth factor. Ready to experiment with some new shapes and bold flavors? Check out our latest cooking recipes for some serious pan-swapping inspiration! The So Yummy way is all about joy over perfection, so don’t be afraid to try a new pan and see what happens. Every swap is just another fun experiment on your way to sweet success.
Baking Without a Scale? Genius Hacks for Every Kitchen
Imagine you are at a cozy vacation rental or your favorite tools are stuck in a mid-cycle dishwasher. Don’t panic! You can still create something sweet, stunning, and satisfying without a single measuring cup in sight. While our baking measurement conversion chart is the gold standard for pro-level precision, true kitchen magic comes from being a little daring. Creative improvisation is the mark of a truly confident, adventurous, and inspired baker! We love turning “oops” moments into “wow” results by using everyday items as secret measuring weapons. It makes the process feel like a fun experiment rather than a chore. Let’s dive into some quick, quirky, and clever hacks to save your bake!
The Mug Method: Measuring with Household Items
Look in your cupboard for a standard coffee mug. Most average mugs hold between 8 and 10 fluid ounces. While it’s not a lab-grade tool, it is a fantastic emergency backup for keeping your ratios consistent! If you need a liquid measure, a clean 16.9-ounce water bottle is almost exactly two cups. You can even ditch the tools entirely and try the legendary 1-2-3-4 cake method. This classic recipe uses one cup of butter, two cups of sugar, three cups of flour, and four eggs. It is a rhythmic, reliable, and really fun way to build a masterpiece from scratch! These household swaps keep the energy high and the barrier to entry low. They prove that you don’t need a professional kitchen to produce something daring, delightful, and delicious. Just remember to use the same mug for all your ingredients to keep those proportions in check!
Visualizing Volume: The Hand Guide
Your own hands are the most portable, practical, and personal tools you own! Did you know a teaspoon is roughly the size of your thumb tip? It is the perfect way to estimate those bold, aromatic, and essential spices like cinnamon or nutmeg. If your recipe calls for 1/4 cup of crunchy nuts or melty chocolate chips, a single cupped hand is your best visual guide. Even the classic “pinch” is a legitimate and historic baking measurement! It’s actually about 1/16th of a teaspoon. Using these visual cues makes the whole process feel like a playful gathering of ingredients. It connects you to the sensory, physical, and emotional side of baking. Once you’ve mastered these hacks, head over to our latest cooking recipes to see how these quick tricks can lead to instant gratification. Your baking measurement conversion chart is always there for the math, but your hands are there for the heart!
Bake Your Dreams Into Reality!
You’ve mastered the spoon shuffle, decoded the liquid vs. dry mystery, and unlocked pro-level precision with grams! This baking measurement conversion chart is your ultimate ticket to a world of flaky, gooey, and gorgeous treats. Whether you’re swapping pans or ditching the scale for a genius hack, you’re now ready to create with total, fearless, and amazing confidence. Baking is a science, but it’s also a high-energy celebration of flavor and joy!
We are voted the most creative food media brand and trusted by millions of home bakers worldwide. Our award-winning kitchenware line is built to make every experiment a sweet success. Are you ready to see what’s next on your delicious journey? Check out our latest creative recipes and kitchen tools at So Yummy! We can’t wait to see the magic you whip up in your kitchen today. Grab your whisk, turn up the music, and let’s get glowing!
Baking Brilliance: Frequently Asked Questions
How many tablespoons are in a 1/4 cup?
Four tablespoons make one perfect quarter cup! It is the ultimate shortcut for high-energy mixing when you’re in the zone. This quick ratio helps you keep your flow without stopping to find the big cup. It’s fast, simple, and satisfying for every home baker!
Is a fluid ounce the same as a weight ounce in baking?
No, these two measures are totally different! A fluid ounce measures volume while a weight ounce measures mass. For example, 8 fluid ounces of flour by volume weighs only about 4.25 ounces. Use your baking measurement conversion chart to keep these straight for a perfectly risen cake that looks and tastes amazing!
How do I convert a recipe from Fahrenheit to Celsius?
Subtract 32 from the Fahrenheit number, multiply by 5, and divide by 9 to get Celsius. It sounds like a lot of math, but it’s just a fun little puzzle for your next global bake! For most recipes, 350°F is roughly 175°C. This trick lets you explore bold international flavors with total ease and excitement.
What is the best way to measure flour without a scale?
Use the “spoon and level” method for the fluffiest, most delicious results! Gently spoon your flour into the cup until it mounds over the top. Then, sweep the excess away with a flat knife. This prevents you from packing the flour and keeps your treats light, airy, and gorgeous every single time!
How many grams are in a cup of all-purpose flour?
One cup of all-purpose flour typically weighs about 125 grams. However, a packed cup can weigh as much as 160 grams! This variance is why using a scale is such a game-changer for consistent, reproducible, and professional results. It’s the secret to that perfect crumb that makes your friends say wow.
Can I use a liquid measuring cup for dry ingredients?
It is possible, but we don’t recommend it for dry ingredients! Liquid cups don’t allow you to level off the top, which can lead to measuring way too much flour or sugar. Stick to flat-topped dry cups to ensure your masterpiece is balanced and beautiful. Accuracy is the heartbeat of sweet success in every kitchen experiment!
How many teaspoons are in a tablespoon?
Three teaspoons always equal one glorious tablespoon! This is the most basic rhythmic ratio in your kitchen. It’s the foundation for adding those bold, aromatic, and essential spices that make your bakes pop. Memorize this tiny rule for instant gratification during your next creative gathering.
How do I scale a recipe for a different pan size?
Compare the volume of your original pan to the new one to scale your ingredients perfectly! An 8-inch round pan holds about 6 cups, while a 9-inch square holds about 8 cups. Adjust your ingredient amounts and bake times to keep the depth consistent. It’s a fun experiment that lets you turn any recipe into a party-sized treat for all your favorite people!
